iPinit: Recipes   
Showing posts with label Recipes. Show all posts

Sunday, November 3, 2013

Pumpkin Pie From A Pumpkin??? Heck Yeah!

Halloween is over, Thanksgiving is just around the corner, the mornings are getting cooler and of course Starbucks released their Pumpkin Spice Latte early! I am in the mood for a good slice of pumpkin pie.

I came across this website a few years ago while looking for a place to pick fruits for canning. http://www.pickyourown.org. While perusing through the website, I found a RECIPE for Pumpkin pie made from real pumpkins.  Really?? I always thought pumpkin pie came in an orange can, you added some other stuff, threw it all into a pie crust and viola.....Pumpkin Pie! NO WAY! This is the real deal and I will NEVER make Pumpkin Pie from a can EVER again.

So to start lets gather some ingredients.
  • 1 Pumpkin Pie Pumpkin
  • 1 C. Sugar
  • 1.5 tsp ground cinnamon
  • 1 tsp ground cloves
  • 1 tsp ground allspice
  • 1/2 tsp ground ginger
  • 1/2 tsp ground nutmeg (this is NOT in the Pick Your Own recipe but I like it)
  • 1/2 tsp kosher salt
  • 4 large eggs (fresh from the hen house at my house)
  • 1.5 cans (12 oz each) of Nestle Carnation Evaporated Milk
  • 1/2 tsp vanilla extract (I use Mexican Vanilla because I think it has a wonderful flavor)
  • 3 C. pumpkin Goop (This will be step one. Instructions to follow)
Next, I gather all of my Equipment.

This may seem like a bit of work and the canned pumpkin version may seem like it is easier but honestly it is very easy and tastes much better. OK So Lets Get Started.

Grab that pretty pie pumpkin!
Preheat your oven to 425. Cut your pumpkin in half. Remove the seeds and as much of the pumpkin strings as possible. Place the pumpkin face down into a microwave safe dish. Fill with 1-2 inches of water. Microwave on high for 12 minutes. (Microwaves vary so cooking times may vary) Also my microwave cannot accommodate both halves so I have to do them individually for a total of 24 minutes.
While the pumpkin is cooking, you can prepare your pie pan or pans. Unroll the pie crusts and place into the pan. If you are using a deep dish baker like the Pampered Chef Deep Dish Pie Plate, you will need both pie crusts.  Unroll and place one in the center of the dish. I use a knife and cut the remaining pie crust into strips and fill in around the edges.  
You want to be able to easily scrape the meat out of inside with your scoop.
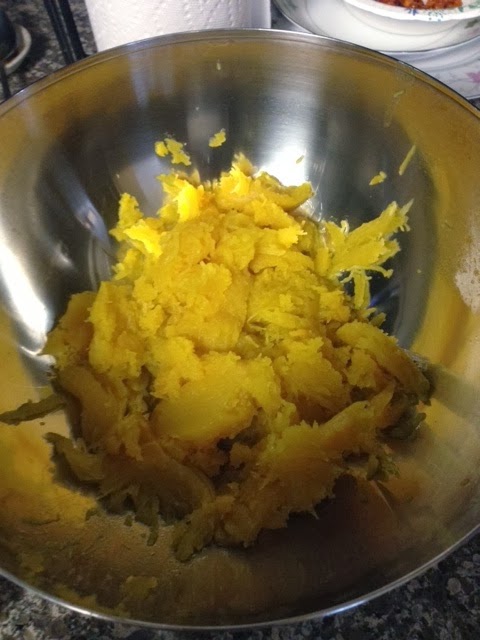
Once you have cooked both halves, scrape the meat into a mixing bowl.
It may look a little stringy but I have a solution for that. My husband bought me this handy little tool for Christmas. Cuisinart Smart Stick Hand Blender. It works like a champ......as he would say.


This is where you end up with the "Pumpkin Goop!"
Whew! That is the hardest part. It is smooth sailing from here.  Now we are ready to assemble all of those ingredients.
I like to pre-measure all of my spices so I can add them in all at once.
In a large mixing bowl, mix together all of the ingredients.  Mix well with a whisk.  
Pour into your prepared pie pan or pans.  This recipe will completely fill the Pampered Chef Deep Dish Pie Pan.

This is where the tin foil comes in. The pie will be in the oven for a while so I place tin foil around the edges of the pie to prevent it from burning. If the tin foil will not stick, you can make a tin foil tent for your pie to making sure the foil does not touch the pie filling. 

**TRICK Place a baking sheet on the oven rack and place the pie shell on the baking sheet before filling. This way you can fill the shell place the foil tent and close the oven without having to worry about walking with the filled shell and spilling on the edges like I did.
Bake at 425 for 15 minutes then reduce the temperature to 350 and continue to cook. Again cooking times will vary. I ended up cooking my pie for 1.5 hours at 350. Check your pie every 30 minutes to test for doneness. I use the toothpick method.

You can add some cute fall cutouts the last 15 minutes of cooking. I used my Pampered Chef Fall
Cutter set. They do not sell these any longer, however you can use any cookie cutters you have or use your imagination and create your own designs.
This truly is the best pumpkin pie I have ever had. It doesn't last long in our house. No Whipped cream required! Try it Im sure you will agree.

**Any extra Pumpkin Goop you have can be frozen and used to make another pie or can be used to make a pumpkin shake. YUM!

Ciao for now

Kris

Monday, December 3, 2012

Homemade Kahula


Homemade Kahlua


2 - 1.75 liter bottles Cruzan dark rum from St. Croix (I like this one because it is dark and has a wonderful flavor but is not a spiced rum)

6 - cups of sugar

3 - cups instant coffee (I used Nescafé dark roast)

3 - cups brown sugar

1.5 ounces pure vanilla

8 - cups water

Start by combining both bottles of Cruzan rum and 2 cups of instant coffee in a large pot or bowl.
Stir. Cover and let sit for three days in cool dark place.

After three days you are ready for step two.

Place 6 cups of water in a pot on medium heat. Do not let the water boil.

Place 6 cups of plain white sugar in a large pot. Place on stove top at medium heat. (Depending on your stove, you may need to increase or reduce the heat. I have a glass top so I needed my heat on high.) Stir sugar constantly until it is completely melted. (With my stove, it took me about 20 minutes.) You will have a nice honey brown syrup.
Remove from heat. SLOWLY add the hot water a cup at a time. Be careful not to splash. (HOT SUGAR makes nasty burns.) This will make a sizzling sound and the sugar will bubble and steam. (I wore oven mitts because it was HOT) Continue to add until all of the water is mixed with the sugar.

In he same pot that you had the water in, place 3 cups of brown sugar, 1 cup of instant coffee and 2 cups of water. Heat until the sugar is dissolved.

Add the brown sugar water to the rum mixture.

Add the vanilla.

Viola! You have Kahlua!

I bought some really pretty bottles at Hobby Lobby and bottled mine for gifts.

Enjoy!

Ciao for now!

Kris


Thursday, July 12, 2012

Texas Roadhouse Rolls

OK So My Friend Amy found this recipe on Pinterest for Texas Roadhouse Rolls. She tried it and it didn't work out so well for her so I decided to try it myself and share the results with you. Here this is the post, http://pinterest.com/pin/280912095477943946/

My friend said that hers turned out more like biscuits so my immediate thought was they didn't rise long enough. Here are my results:

I followed the recipe as directed and ended up with this:

After the initial rising, I spread the dough out onto a floured piece of foil then folded it over and transferred it to the baking sheet. I then pressed it evenly to fill the sheet. I cut the dough into squares using a pizza cutter, sprayed them with olive oil, covered and let it rise.

It ROSE!
I brushed it with melted butter an placed it in the oven. Unfortunately I do not have a convection oven, however, the rolls turned out great. They were yeasty, buttery, hot and good!

This was a great recipe. Follow it. don't skip steps. YUM!

cio for now - Kris

Saturday, June 9, 2012

Pink Lemonade

OK So My husband and me were watching Bride's Maids and he asked me "how do they make Pink Lemonade?" I wasn't quite sure. Are there really pink lemons??? No Way! So I decided to find out and let all of you out there that do not know how they make Pink Lemonade PINK!


According to Wikipedia, -(Pink lemonade may be colored with the juices of raspberries, cherries,  red grapefruit, grapes, cranberries, strawberries, grenadine or artificial food dye. Though pink-fleshed, the ornamental Eureka lemon is not used as its juice is clear and typically too sour to drink.

The New York Times credited Henry E. "Sanchez" Allott as the inventor of pink lemonade in his        obituary: At 15 he ran away with a circus and worked in a lemonade concession. One day while mixing a tub of the orthodox yellow kind he dropped some red cinnamon candies in by mistake. The resulting rose-tinted mixture sold so surprisingly well that he continued to dispense his chance discovery.[7]

Another theory, as recorded by historian Joe Nickell, in his book Secrets of the Sideshows, is that it was Pete Conklin who first invented the drink in 1857 when he used water dyed pink from a horse rider's red tights to make his lemonade.)

http://en.wikipedia.org/wiki/Lemonade

I Don't know about you guys but Pink Lemonade made from water dyed from a horse rider's red tights is pretty gross! Could it even taste like lemonade?

SO there you have it Mr. Bill. No Pink Lemons here just plain ole' fruit juice or your rival Food Dye! I think I may try the cinnamon candies in a homemade lemonade to see what that taste like. Stay tuned.....I will not be using horse rider's tights or any other article of clothing for that matter. I think it would take more than lemons to cover that up.

Ciao - Kris

Tuesday, May 29, 2012

What's For Dinner

OK SO I didn't think I would make two posts in one day but here I am. I found this great recipe for Island Chicken on...Yeup you guessed it Pinterest. http://pinterest.com/pin/280912095477670517/
It looked so yummy I wanted to lick my iPad. I followed the directions for the marinade except instead of soy sauce I added Organic Tamari. It tastes like soy sauce but is soooo much better.
I had to taste it before I added the chicken just to see what it was like. I have to say it was a little bland for my taste. When I think of "Island Food" I think of flavor and spice! So I decided to tweak this as bit. I was on a mission for Island Flavor. For starters, I added another clove of garlic....I LOVE GARLIC! I was looking for some spice but really didn't want to go the cayenne pepper route. I decided to use Sriacha Hot Chili Sauce. I added a tablespoon for some heat (I would like more but the kids were eating too so I had to tone it down. I felt that it also needed something sweet so that is where the honey comes in. I added a tablespoon of honey and taste tested again. YUM!
After marinating for a couple of hours......on the grill it went. I have to say it turned out pretty darn good! I served it with grilled asparagus, marzano tomatoes with Gorgonzola cheese with a balsamic drizzle and of course a nice glass of pinot grigio white wine.
I recommend this recipe but taste the marinade first and tweak to your taste. Bon Appetite!